Bluetooth Device Connection Wizard
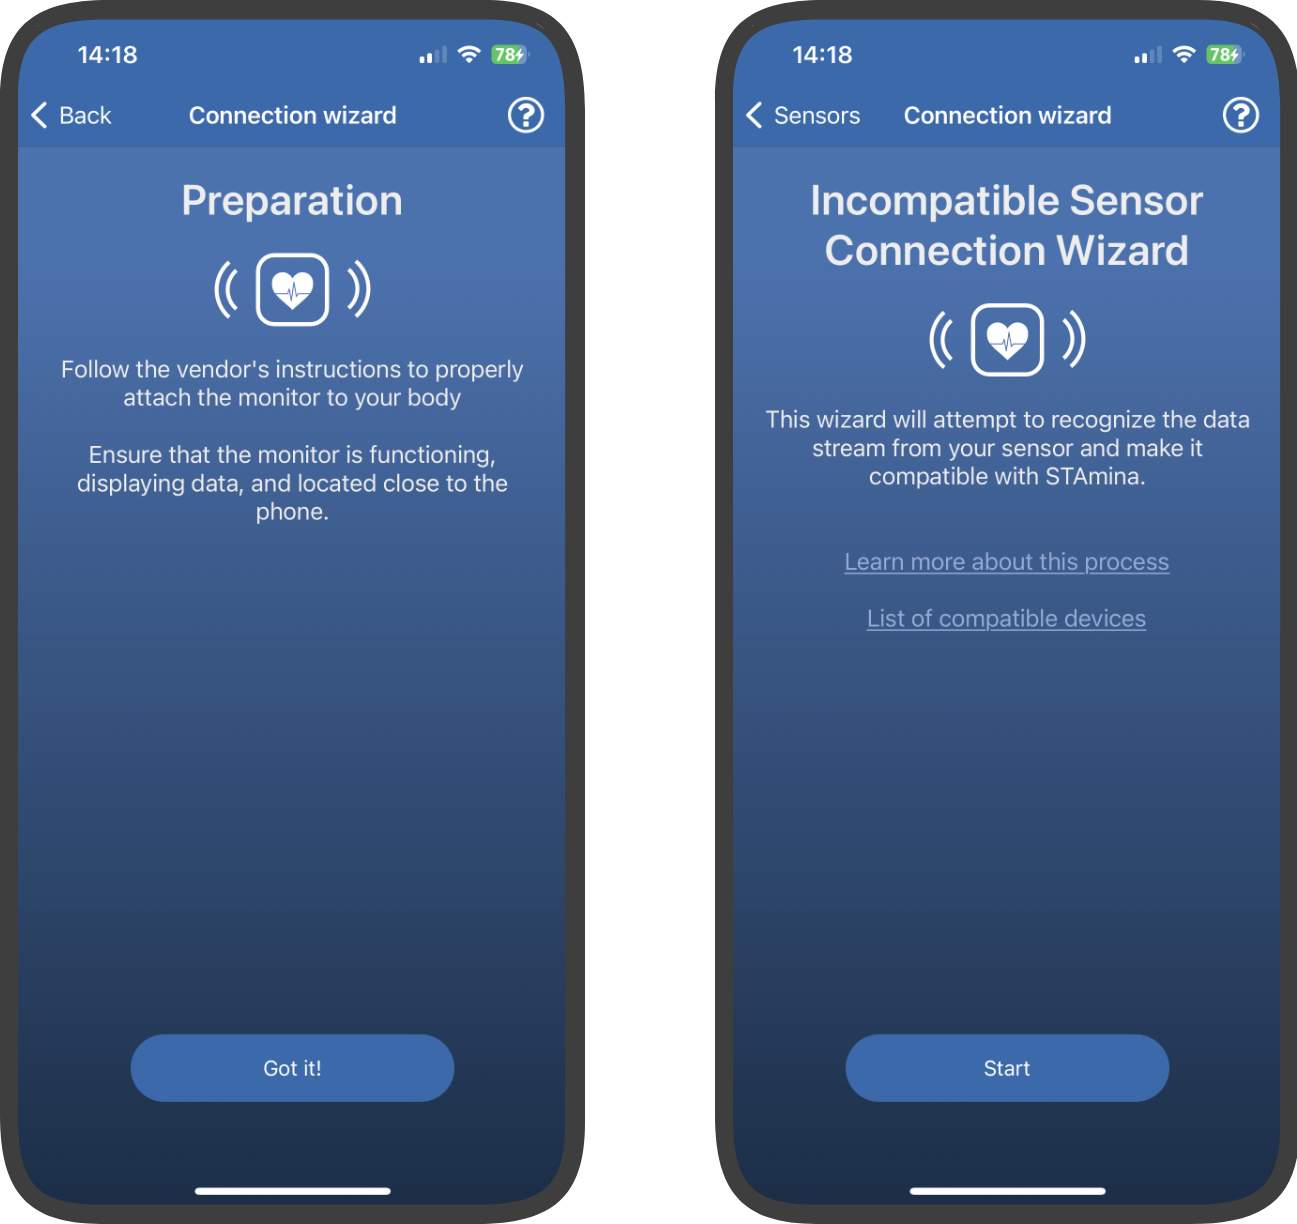
The Bluetooth Device Connection Wizard serves as a valuable tool designed to simplify the process of connecting an incompatible pulse oximeter or heart rate monitor to STAmina. By providing a semi-automated investigation of the data stream, this wizard streamlines the integration process, ensuring seamless compatibility between the device and the STAmina application.
Please note that there are certain technical limitations to consider, and as a result, not all devices can be successfully added using this process. For instance, pulse oximeters that utilize sophisticated communication protocols, employ encryption mechanisms, or necessitate specific commands to enable data streaming may pose challenges. However, the application will make its utmost effort to identify and notify you if you encounter such a device during the connection process.
Start the Wizard
Below is a comprehensive walkthrough that outlines each step of the wizard. Feel free to refer to this guide if you have any questions along the way. However, if you find yourself stuck or in need of assistance, please don't hesitate to contact us directly. We're here to help!
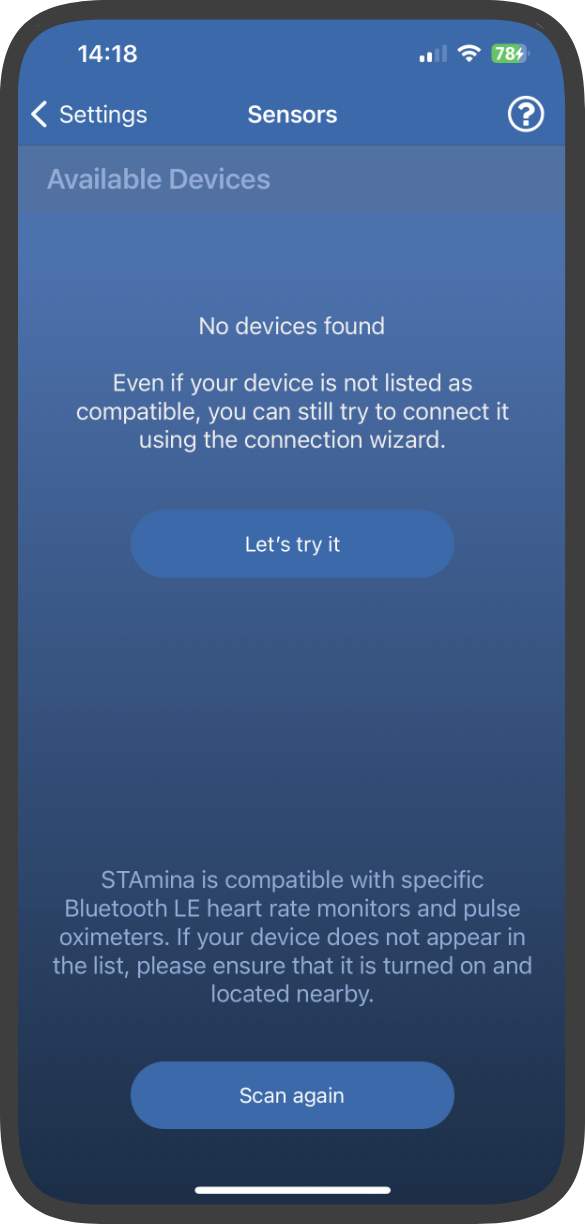
The starting point of the wizard is the device connection screen (Settings > HR, Pulse oximeters). In the event that no compatible devices are detected, you will be presented with an option to launch the wizard.
Before proceeding with the device connection, it is crucial to adhere to the vendor's instructions for correctly attaching the monitor to your body. Make sure that the monitor is properly secured and positioned according to the vendor's guidelines. Additionally, ensure that the monitor is functioning correctly and displaying data. It is recommended to keep the monitor in close proximity to your phone to ensure a strong and stable connection during the setup process.
Note that certain pulse oximeters, such as the Medisana PM 100, may require enabling the real-time reading mode directly on the device. This means that in order to establish a successful connection and receive live data updates, you may need to activate this mode on your pulse oximeter.
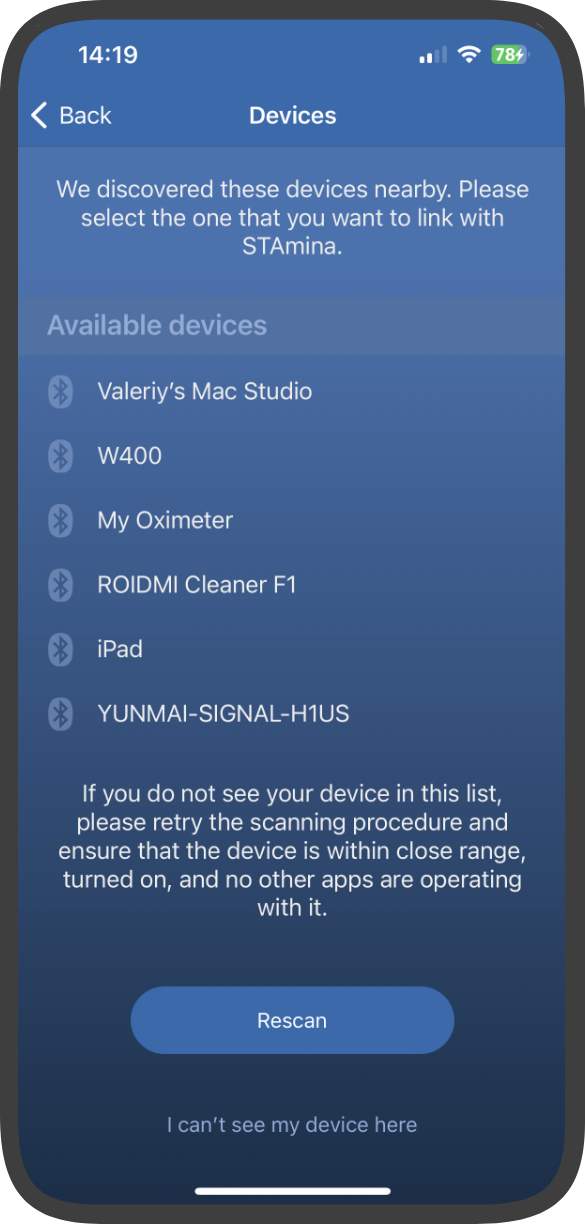
In the subsequent step, the application will scan for all Bluetooth Low Energy (LE) devices nearby. To proceed, you must tap on the name of your pulse oximeter from the provided list. It is crucial to ensure that no other apps associated with the pulse oximeter, including native vendor's apps, are running simultaneously. Failure to close these apps may result in the pulse oximeter not appearing in the list of available devices.
The application is now prepared to link the SpO2 value within the data stream. However, if you are attempting to connect a device that does not measure or stream SpO2, you have the option to skip this step by tapping on the link provided below.
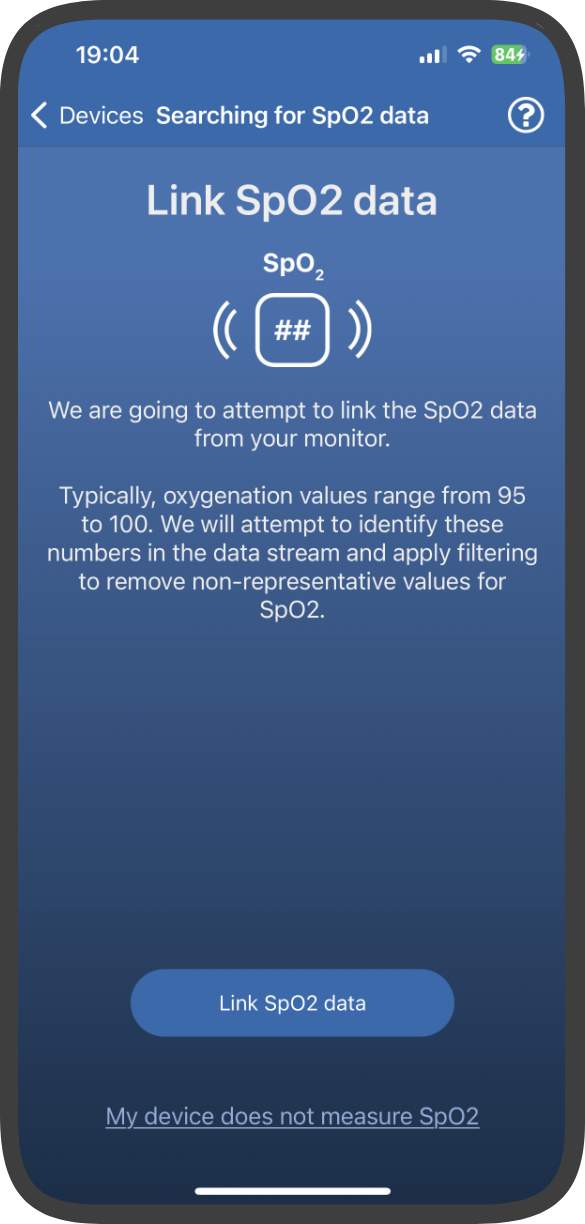
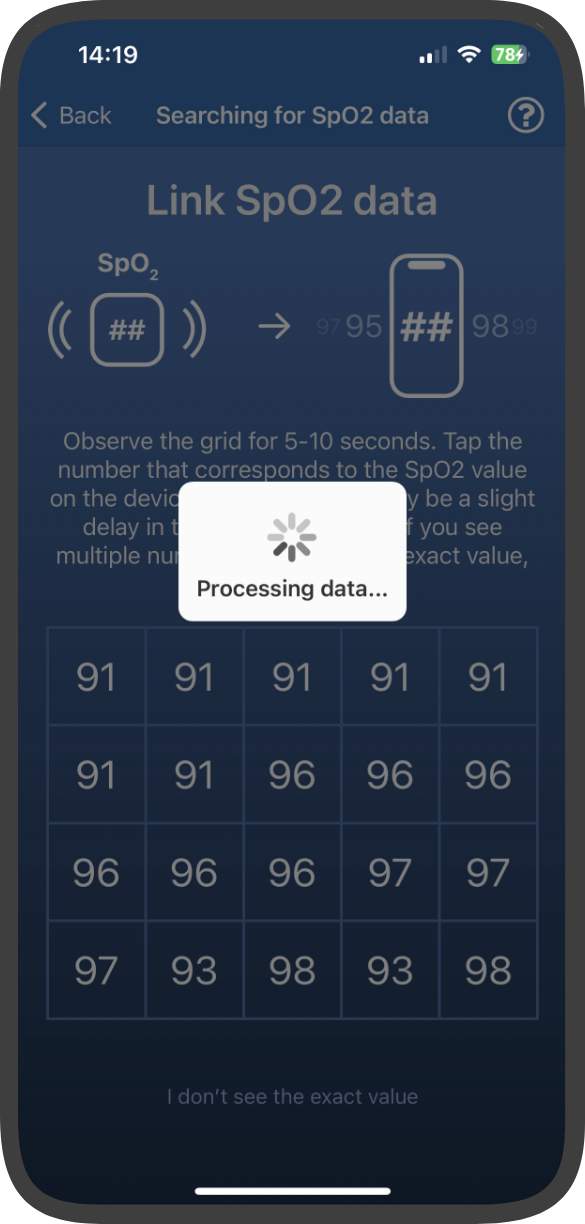
Upon reaching the linking page, you will be presented with a grid displaying values obtained from the connected device. The application will make an effort to filter out values that are not relevant to SpO2 measurements. The longer you stay on this screen, the better the filtration process becomes, ensuring more accurate results.
Here's what you should do on the linking page:
- Observe the values displayed in the grid.
- Look for the value that matches the reading you see on your device.
- If you notice multiple values that are the same, it is recommended to wait a bit longer. This allows the application to assist you in identifying the correct value by further refining the filtration process.
- If, even after waiting for 20-30 seconds, you still encounter similar values, you can simply select the first one that matches your device reading.
- Tap on table cell that contains your SpO2 value.
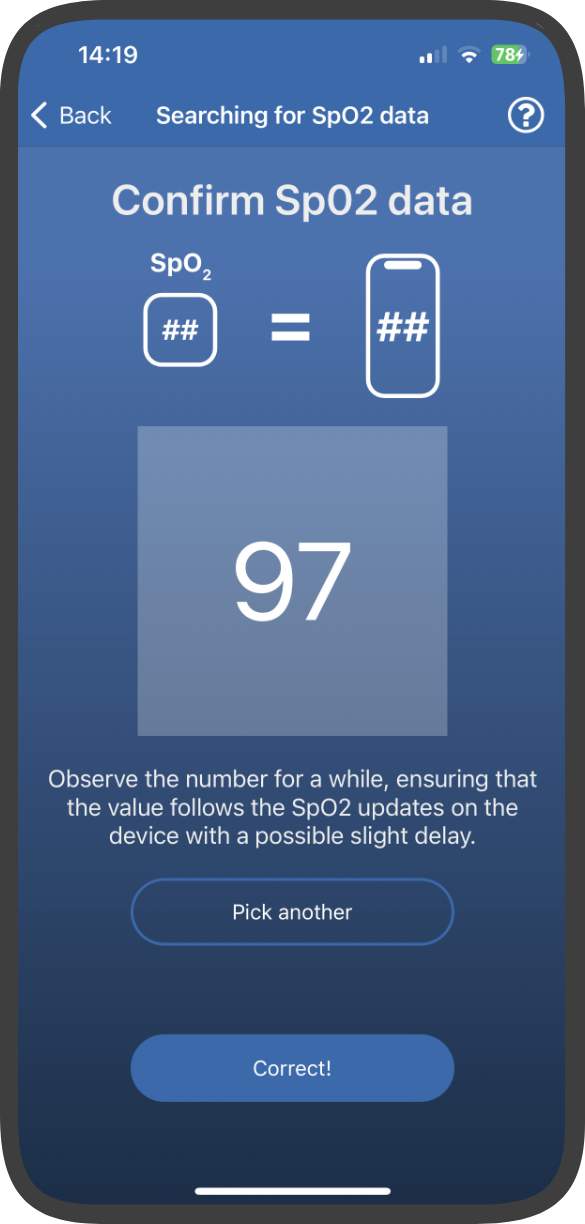
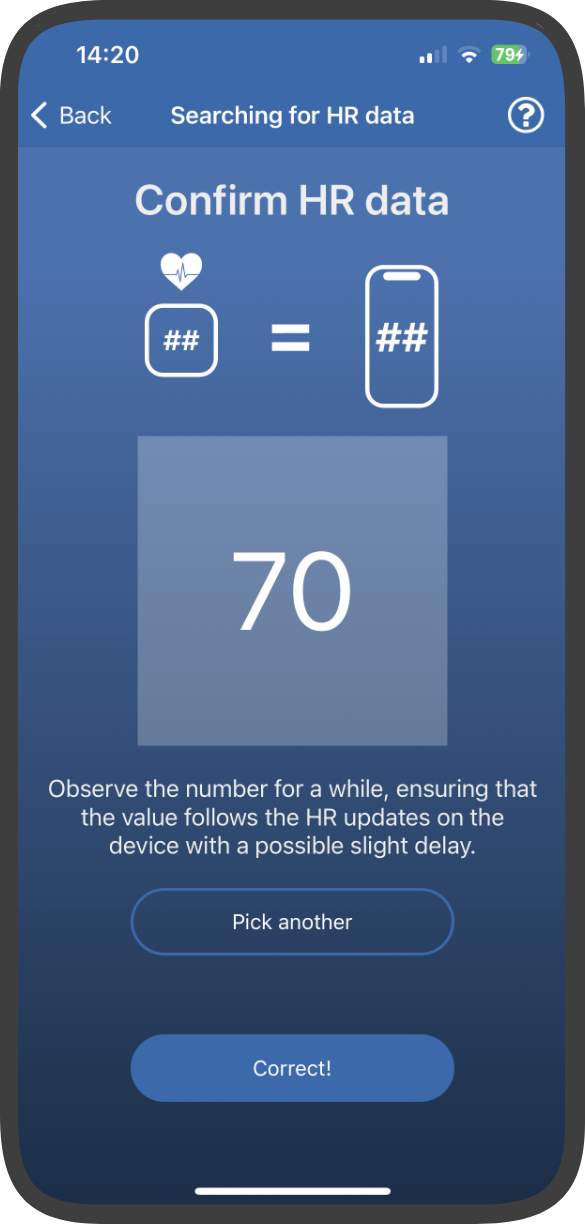
After selecting the candidate for SpO2, you will be directed to a confirmation page. On this page, take a moment to observe the displayed value and ensure that it accurately reflects the changes on your device. Please note that there might be a slight delay in how the number updates.
Here's what you should do on the confirmation page:
- Observe the value for a brief period and confirm that it consistently reflects the SpO2 reading on your device.
- Keep in mind that there might be a slight delay in the update of the displayed number, so allow some time for synchronization.
- If the value on the confirmation page correctly represents your SpO2 reading, you can proceed by confirming the number.
- However, if the displayed value does not match your device's SpO2 reading, you can tap on the "Pick another" button to return to the previous screen and select a different candidate.
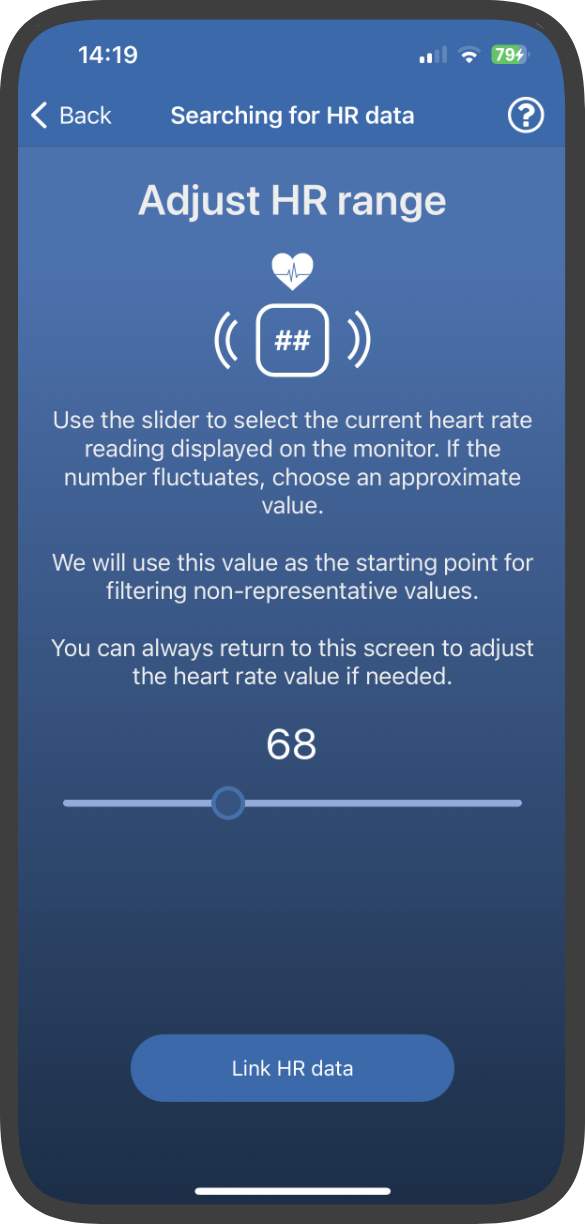
Moving forward to the next step, the application is prepared to repeat the linking process, but this time for the HR (heart rate) value. Unlike SpO2, HR values can vary across a broader range. To initiate the process, the first step is to inform the app about your current HR value by using the provided slider.
Here's what you need to do for the HR linking process:
- Use the slider to indicate your current HR value.
- If your HR value fluctuates frequently, there's no need to select the exact value. Instead, choose an average value within a range of 5-7 beats per minute (bpm).
By following these steps, you will provide the app with a reference point for your current HR value, enabling it to accurately analyze and link the HR data from your device.
The linking step for HR is similar to the process we previously covered for SpO2, with one notable distinction. If your heart rate changes significantly from the value you selected on the previous screen, you may encounter a screen with no values displayed at all. In such a scenario, simply tap on the "Adjust HR range" button, and you will be able to repeat the process.
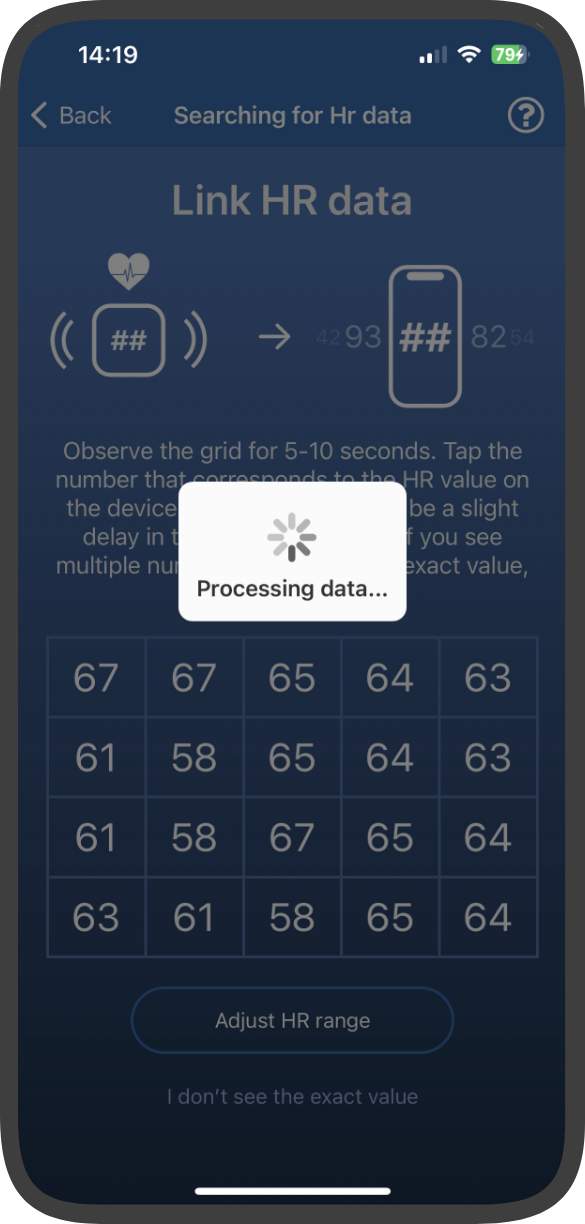
Once a candidate for the HR value is identified, you will be presented with the confirmation screen once again.
Here's what you should do on the confirmation screen:
- Take a moment to observe the displayed HR value and ensure that it corresponds to the changes in your device's heart rate.
- Keep in mind that there might be a slight delay in how the number updates, so allow some time for synchronization.
- Confirm the number if it accurately represents your current heart rate. If it does, proceed by confirming the value.
- However, if the displayed value does not match your device's heart rate, you can tap on the "Pick another" button to return to the previous screen and select a different candidate.
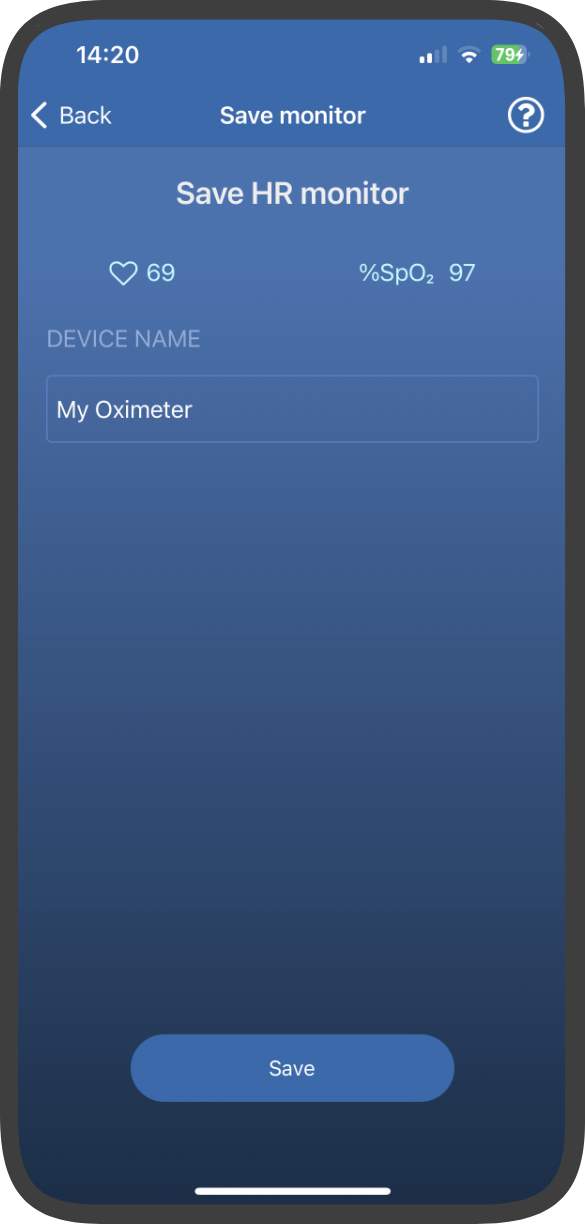
On the final screen, you will have access to live updates for both your HR and SpO2 values. Additionally, you will have the option to give the device a custom name. By default, the application will use the name that the device broadcasted during the initial connection step. When you are satisfied with the device settings, simply tap on the save button to persist the device in the app. Congratulations on successfully completing the setup process!
Please remember that if you have any questions or require further assistance, you can always reach out to us directly. Feel free to contact us at any time, and we will be more than happy to help!
Read next: Garmin Companion App
How to practice
We're working on a knowledge base and tutorial videos to help you with any app or apnea related questions. Meanwhile you can always refer to the in-app 'How to practice' section in the left menu. If you have already read it, but still have a question, please send us a message, we'll be happy to help you.


Vote or Request a feature
Looking for new features? Join our community, share your ideas, discuss how the app should look like, we want to hear from you!
Give us feedbackHow to practice
Do you have a question regarding the training process? We do our best to build a knowledge base, create tutorials and write articles. Please check here.
Feedback and Feature requests
Looking for new features? Join our community, share your ideas, discuss how the app should look like, we want to hear from you!
Give us feedbackOur contacts
Have any other questions? Send us a message, we'll be glad to help you.